
Full System Encryption with SSD Cache
Ultimately, this guide will set up LVM on LUKS and provide full system encryption (with the usual exception of the boot partition) and SSD caching. This is on a laptop with two internal drives, a ~300 Gb spinning HDD at /dev/sda and ~20 Gb solid-state at /dev/sdb.
The solid-state is referenced throughout as a raw device and used functionally as a disk cache. The HDD will be partitioned into a boot partition (/dev/sda1) and a backing for the cache, which is the rest of the file system (/dev/sda2). Logical root and swap partitions will be created on the LUKS device.
Pre-Install
To start, the disk space must be random for LUKS to be secure. “urandom” isn’t an academically secure source, but practically it’s wonderful. Randomizing the disk space took around 7 hours, so hopefully you have something else to do in the near future.
All these steps are executed from the Live Ubuntu 15.04 USB (the distro I’m ultimately installing).
root@ubuntu:/home/ubuntu# dd if=/dev/urandom of=/dev/sda1 || dd if=/dev/urandom
of=/dev/sda2 || dd if=/dev/urandom of=/dev/sdb
dd: writing to ‘/dev/sda1’: No space left on device
1024001+0 records in
1024000+0 records out
524288000 bytes (524 MB) copied, 61.7946 s, 8.5 MB/s
dd: writing to ‘/dev/sda2’: No space left on device
624115713+0 records in
624115712+0 records out
319547244544 bytes (320 GB) copied, 39881.4 s, 8.0 MB/s
37199505+0 records in
37199505+0 records out
19046146560 bytes (19 GB) copied, 2459.74 s, 7.7 MB/s
dd: writing to ‘/dev/sdb’: No space left on device
39091249+0 records in
39091248+0 records out
20014718976 bytes (20 GB) copied, 2615.5 s, 7.7 MB/s
One eternity later, “dd” has provided a secure starting point, now actually make the cache. The solid state is /dev/sdb, and it’ll serve as the cache for /dev/sda2, the backer.
root@ubuntu:/home/ubuntu# make-bcache -C /dev/sdb -B /dev/sda2
UUID:			dbdc901d-c4a4-4798-9c7a-b01948b55d82
Set UUID:		b15258cd-2068-4ab5-bdb6-ed24d1b97559
version:		0
nbuckets:		38175
block_size:		1
bucket_size:		1024
nr_in_set:		1
nr_this_dev:		0
first_bucket:		1
UUID:			c6157b51-0d20-4a6c-9e03-80d1afc466ab
Set UUID:		b15258cd-2068-4ab5-bdb6-ed24d1b97559
version:		1
block_size:		1
data_offset:		16
And we have a cached filesystem. The /dev/bcache0 device is now used to read and write the “true” storage, which is the traditional HDD. By default, bcache operates in writethrough mode. It’s most reliable, and means that the cache actually writes the data to disk before giving confirmation to the kernel. In writeback mode, bcache lies a little for performance. As soon as the cache receives data it informs the kernel it’s been dealt with, then actually handles it later, at a more convenient time. On this system I’m totally willing to gamble for negligible performance, so these next commands switch bcache to operate in writeback mode.
root@ubuntu:/home/ubuntu# cat /sys/block/bcache0/bcache/cache_mode
[writethrough] writeback writearound none
root@ubuntu:/home/ubuntu# echo writeback > /sys/block/bcache0/bcache/cache_mode
Now start the crypto. The cryptsetup commands prepare the device for LUKS encryption, including setting the key password. Then, within the LUKS device, I create an LVM volume (here named “foo”) and swap and root partitions to be used during the Ubuntu install.
root@ubuntu:/home/ubuntu# cryptsetup --key-size 512 luksFormat /dev/bcache0

WARNING!
========
This will overwrite data on /dev/bcache0 irrevocably.

Are you sure? (Type uppercase yes): YES
Enter passphrase:
Verify passphrase:
root@ubuntu:/home/ubuntu# cryptsetup luksOpen /dev/bcache0 foo
Enter passphrase for /dev/bcache0:
root@ubuntu:/home/ubuntu# pvcreate /dev/mapper/
control  foo
root@ubuntu:/home/ubuntu# pvcreate /dev/mapper/foo
  Physical volume "/dev/mapper/foo" successfully created
root@ubuntu:/home/ubuntu# vgcreate vg /dev/mapper/foo
  Volume group "vg" successfully created
root@ubuntu:/home/ubuntu# lvcreate -L 2G vg -n swap
  Logical volume "swap" created
root@ubuntu:/home/ubuntu# lvcreate -l 100%FREE vg -n root
  Logical volume "root" created
root@ubuntu:/home/ubuntu#
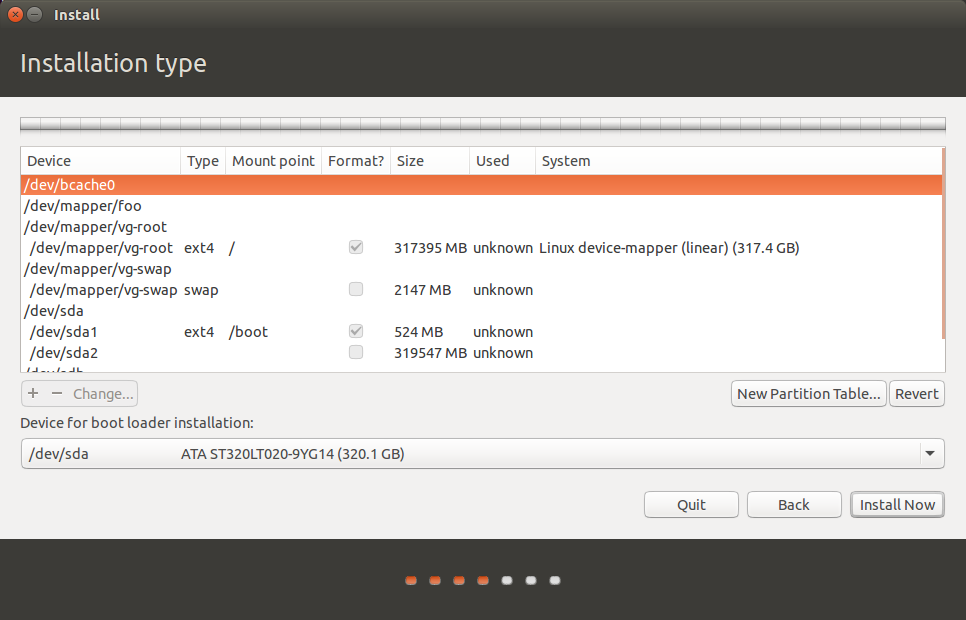
That completes the setup of the encrypted volumes, including the encrypted cache. Now continue with the regular Ubuntu installer, and select to use the logical partitions just created. Request that the installer formats them, since they aren’t already.
Ubuntu Install
After install, there’s a little more work to do to make this system actually bootable.
Post-Install
Linux needs information about encrypted disks on the system in the crypttab file so they can be properly unencrypted and mounted. This requires actually mounting the newly installed devices and generating some configuration in a chroot environment. The init filesystem also needs to be made aware of the complete disk setup, so after the edits are made to the crypttab file, update the init RAM filesystem.
root@ubuntu:/home/ubuntu# mount /dev/mapper/vg-root /mnt/
root@ubuntu:/home/ubuntu# mount /dev/sda1 /mnt/boot/
root@ubuntu:/home/ubuntu# mount -o bind /sys /mnt/sys/
root@ubuntu:/home/ubuntu# mount -o bind /proc /mnt/proc/
root@ubuntu:/home/ubuntu# mount -o bind /dev /mnt/dev/
root@ubuntu:/home/ubuntu# chroot /mnt
root@ubuntu:/# echo 'nameserver 8.8.8.8' > /run/resolvconf/resolv.conf
root@ubuntu:/# apt-get install bcache-tools
[...]
root@ubuntu:/# echo "foo UUID=`blkid -o value /dev/bcache0 | head -1`  none luks" > /etc/crypttab
root@ubuntu:/# cat etc/crypttab
foo UUID=6c87a73d-20bd-406b-a04d-65bf94ec8acd  none luks
root@ubuntu:/# update-initramfs -uk all
root@ubuntu:/# exit
exit
Out of the chroot environment, sync the changes to disk and unmount all the newly installed systems devices. This is the home stretch.
The only gotcha was that Linux automatically started using the new swap partition. Switch the swap off, then the logical volumes can be modified and made active.
root@ubuntu:/home/ubuntu# sync
root@ubuntu:/home/ubuntu# umount /mnt/sys/
root@ubuntu:/home/ubuntu# umount /mnt/proc/
root@ubuntu:/home/ubuntu# umount /mnt/dev
root@ubuntu:/home/ubuntu# umount /mnt/boot/
root@ubuntu:/home/ubuntu# umount /mnt/
root@ubuntu:/home/ubuntu# vgchange -an /dev/mapper/vg
  Logical volume vg/swap in use.
  Can't deactivate volume group "vg" with 1 open logical volume(s)
root@ubuntu:/home/ubuntu# swapoff -a
root@ubuntu:/home/ubuntu# vgchange -an /dev/mapper/vg
  0 logical volume(s) in volume group "vg" now active
root@ubuntu:/home/ubuntu# cryptsetup luksClose foo
root@ubuntu:/home/ubuntu# sync
The system is ready to go at this point. Reboot and you should be prompted for a password. Since the encrypted partitions (swap, root) are located on the same LUKS device, a single prompt will unlock the entire system (as opposed to a LUKS on LVM setup). Now just tweet your password so you don’t forget and you should be good to go.
If this is setup on a laptop, though, there’s one more step you’ll likely want to take. In the bcache FAQ, the author explains that caching should not be active during suspend or resume:
Can I use bcache with suspend/resume?
Yes and no: during resume you are not allowed to make any changes to the disk. However with bcache this can be tricky: any read you make from a bcache device could result in a write to update the caching device. Currently bcache has no good ways of solving this.
Your options are:
[…]
Disable the caching device on bcache before hibernating
Set the cache_mode to none. This will ensure no writes are performed to the caching device. This however has the downside you cannot use bcache performance during suspend and resume.
There are other options for resolving this, but I opted for the author’s suggestion to disable caching completely during suspend and resume. I did so by placing this (executable) file at /usr/lib/pm-utils/sleep.d/50myrules.
#!/bin/sh
# stop/start bcache on suspend/resume

case $1 in
    hibernate|suspend)
        echo none > /sys/block/bcache0/bcache/cache_mode
        ;;

    thaw|resume)
        echo writeback > /sys/block/bcache0/bcache/cache_mode
        ;;
esac

exit 0
References
There were a number of references that helped through this, and a dozen man pages. The first listed here was especially applicable, and this process mostly follows it with a couple minor corrections and preferential edits.
- AskUbuntu. How to install Ubuntu with both disk encryption and SSD caching. http://askubuntu.com/questions/620480/how-to-install-ubuntu-with-both-disk-encryption-and-ssd-caching
- bcache FAQ. http://bcache.evilpiepirate.org/FAQ/
- Arch Wiki. LUKS on LVM. https://wiki.archlinux.org/index.php/Dm-crypt/Encrypting_an_entire_system#LUKS_on_LVM


Leave a Comment